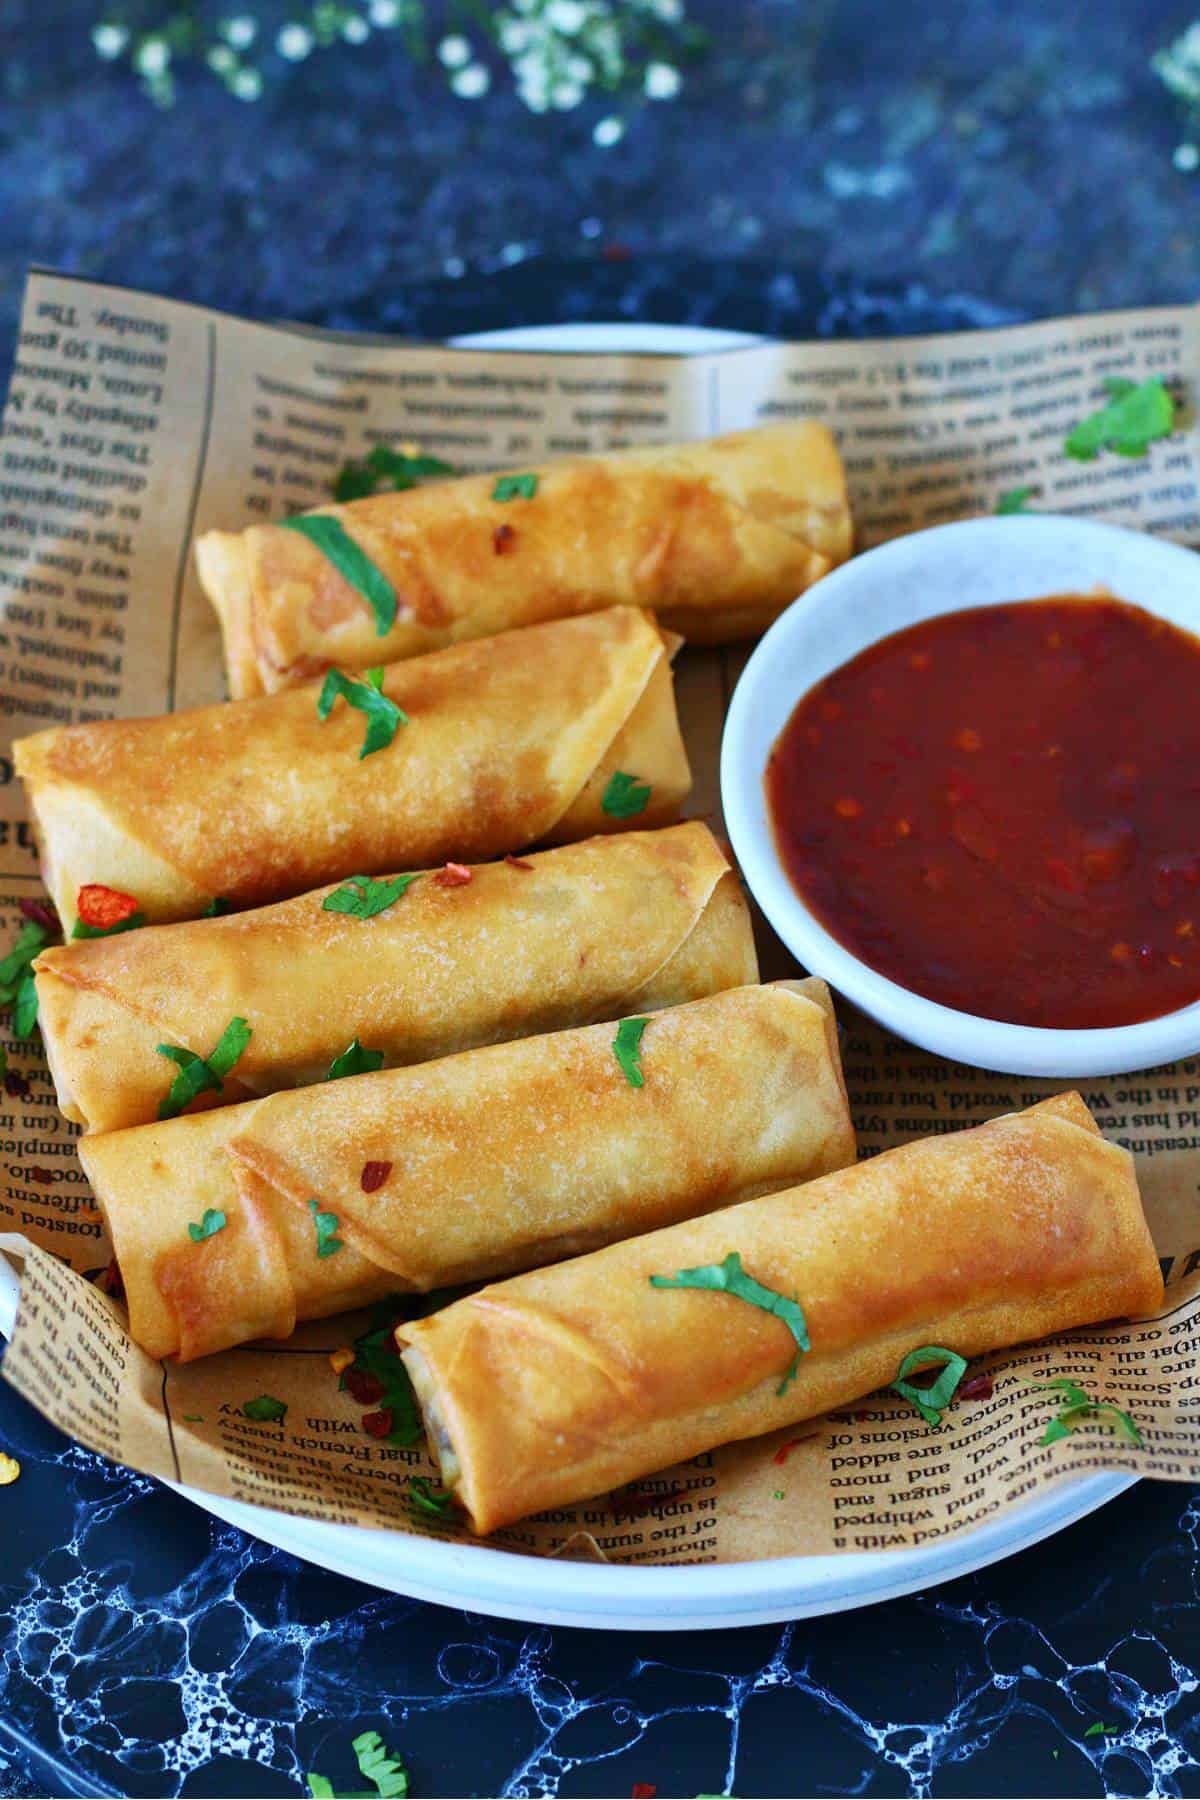
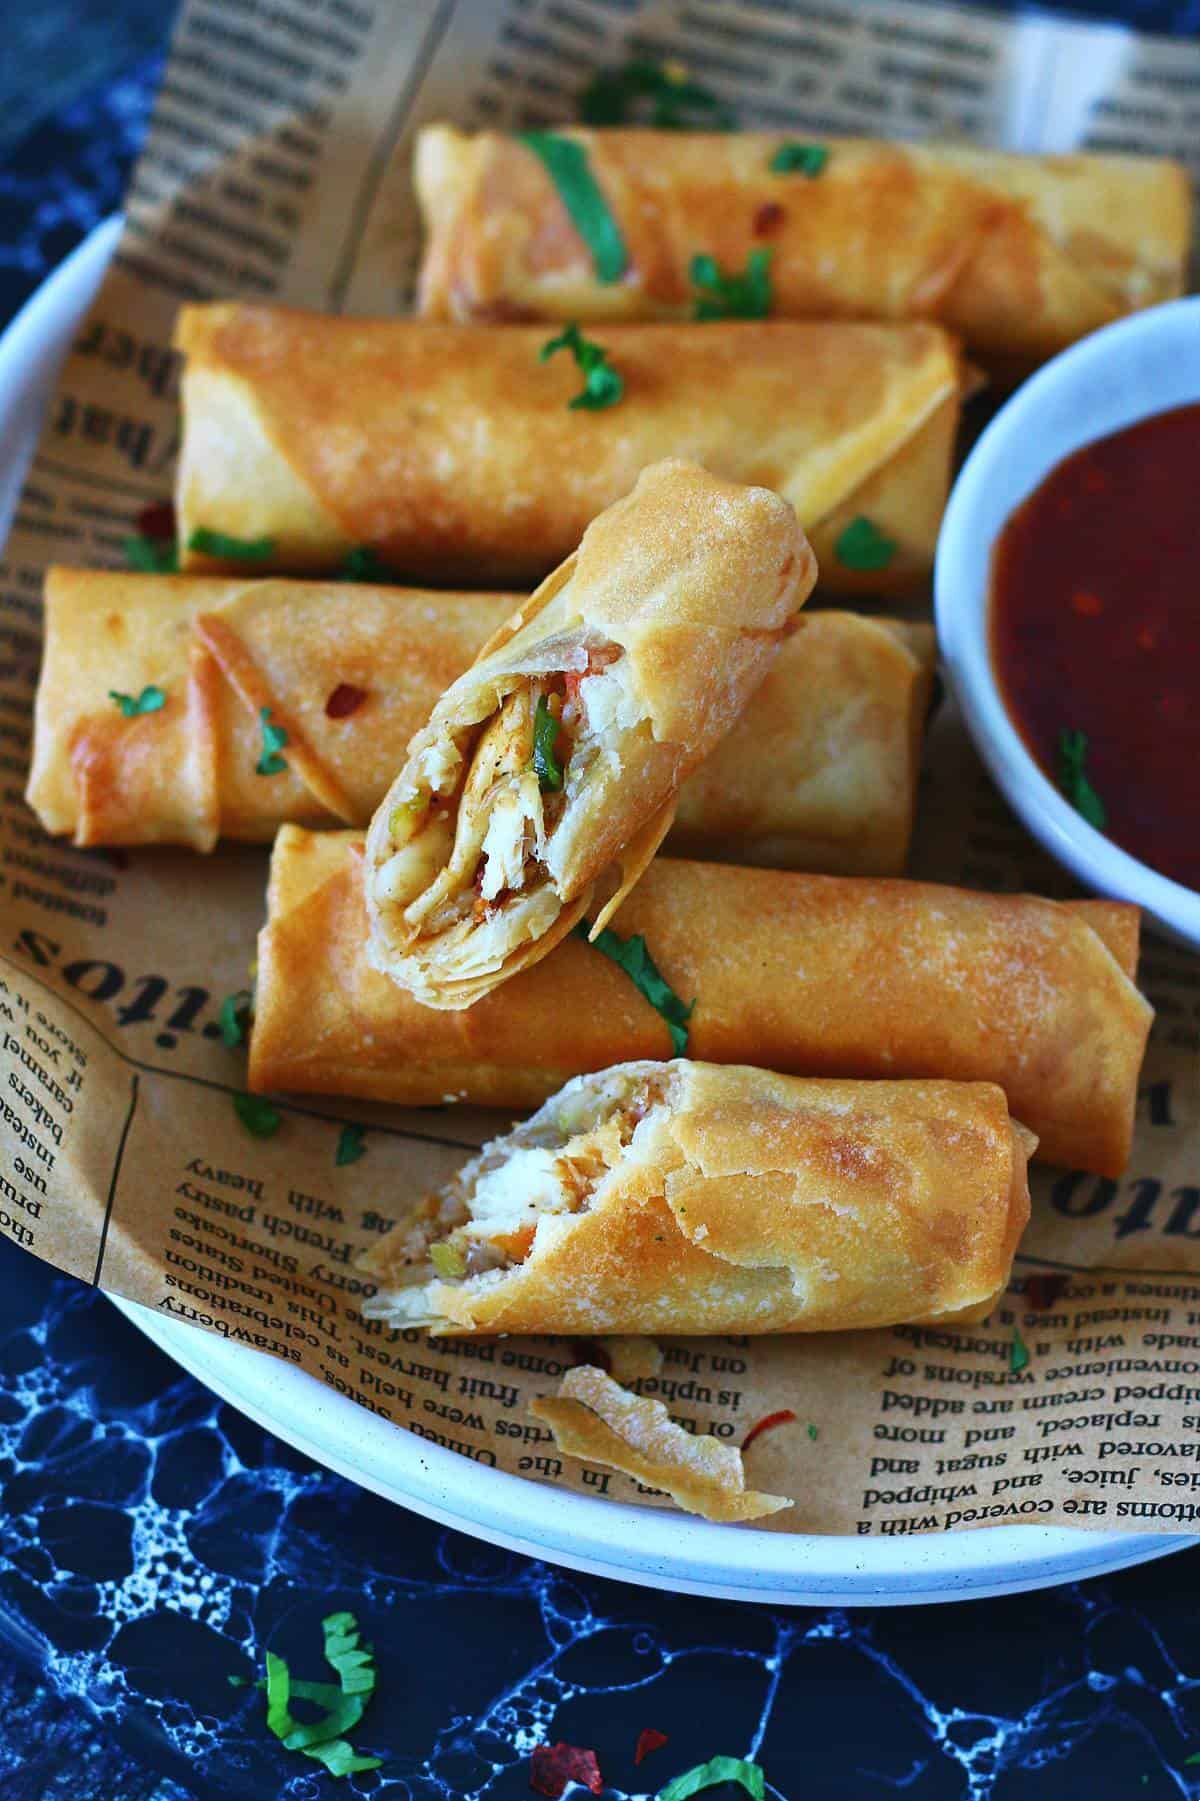
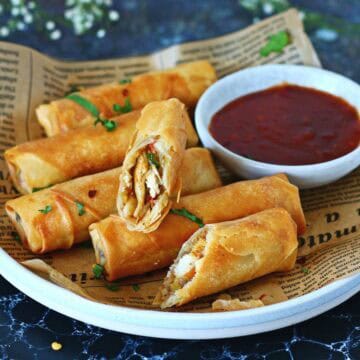
These Chicken Noodle Spring Rolls are perfectly crisp, well-seasoned, and packed with shredded chicken, vegetables, and noodles. They're easy to make in big batches, freeze beautifully for up to 3 months, and fry up golden and delicious whenever you need a quick snack, appetizer, or addictive party dish.
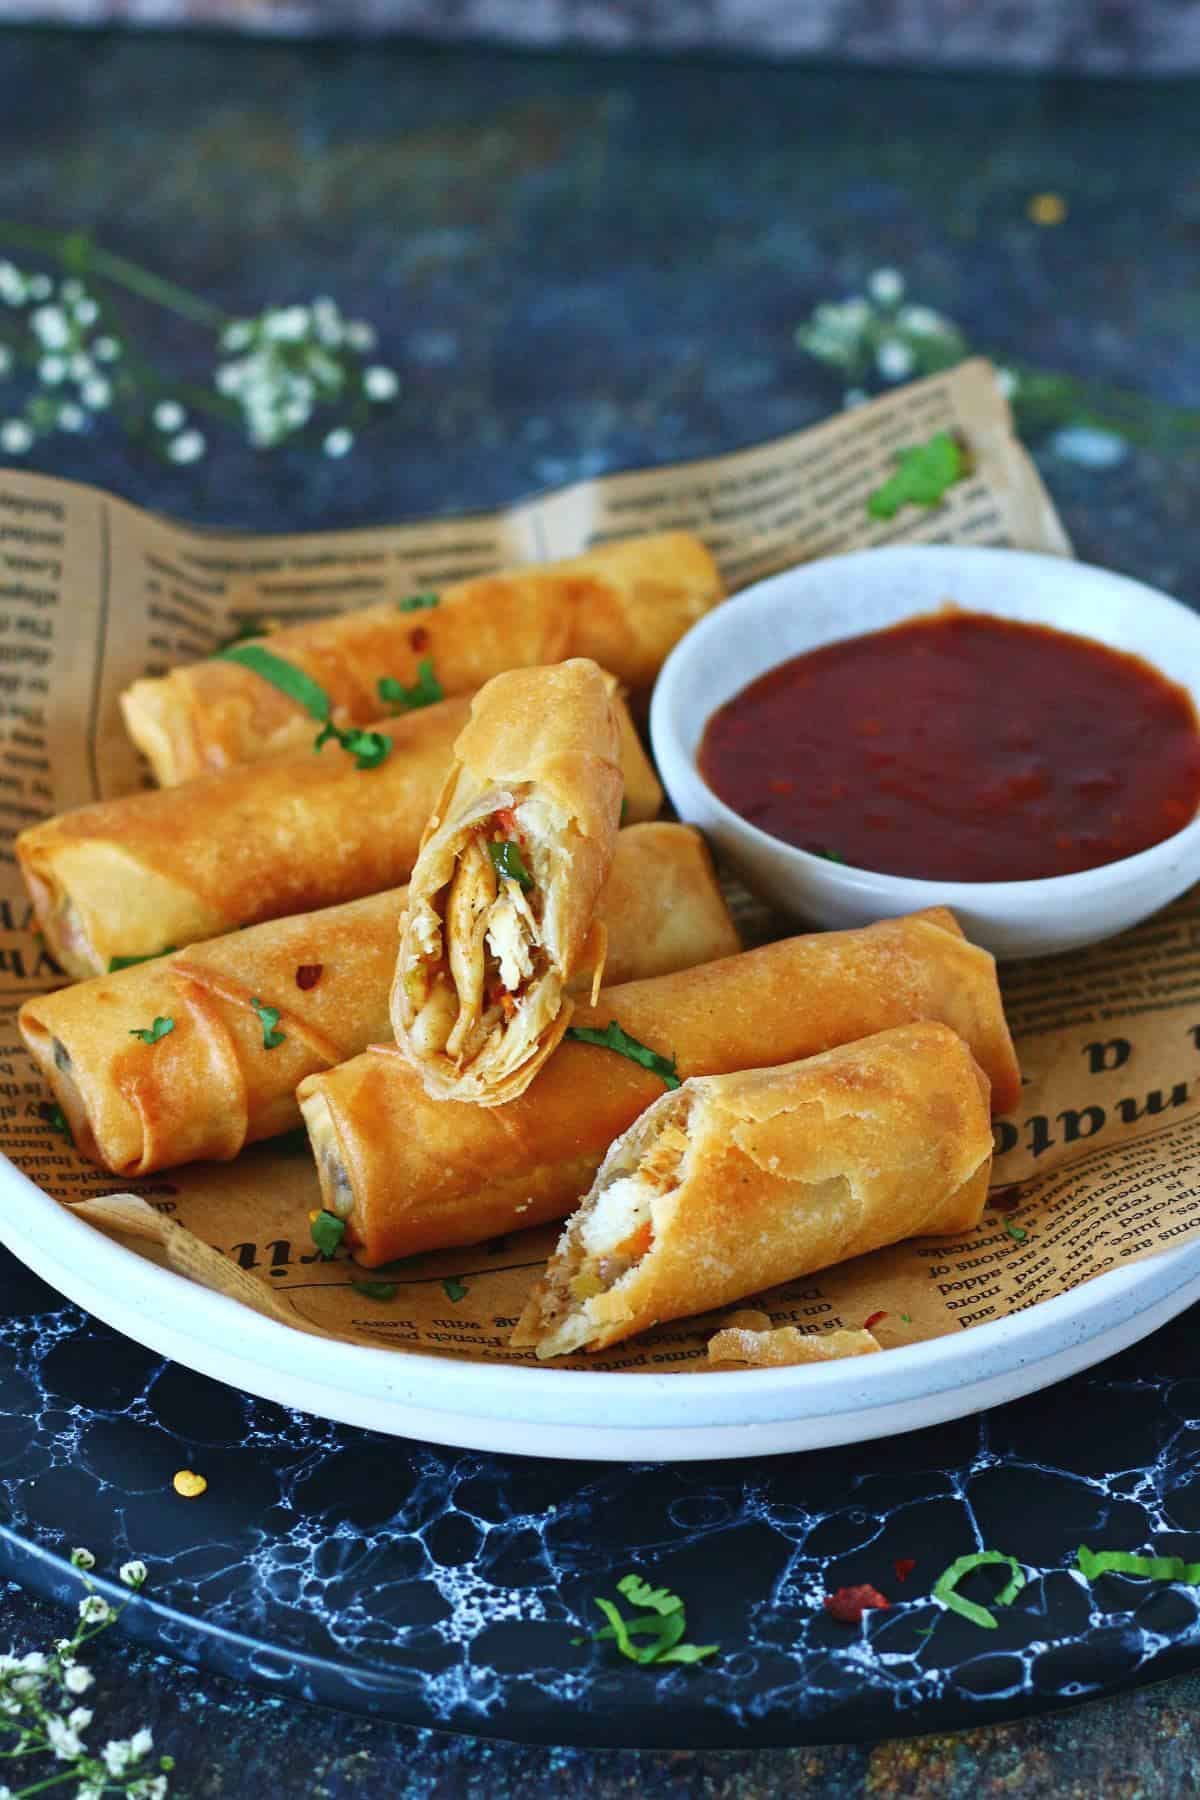
Also known as egg rolls in some regions, these are made with thin spring roll wrappers for a lighter, crisp finish. I've been making these for years, and honestly, once you nail the filling and wrapping technique, they're hard to mess up. Get into a rhythm and you can roll about 30 in 20 minutes, keeping your freezer stocked for whenever the craving hits.
Looking for more crispy snacks? Check out my Keema Samosas, Mini Shrimp Tostadas, Jalapeño Popper Wontons, and Vegetable Pakoras.
Table of Content
Why You'll Love These Homemade Spring Rolls
- Perfect make ahead snacks for parties or iftar
- Freezer-friendly appetizer for up to 3 months, ideal for Ramadan prep
- Crispy exterior with a delicious, well-seasoned filling
- Easy to batch prep for busy weeknights or gatherings
Key Ingredients
- Chicken - I used boneless chicken breast, boiled and shredded. Chicken thighs work great too and stay more tender.
- Noodles - Egg noodles are ideal, cooked just until al dente. Thin spaghetti, ramen (without the seasoning packet), or other quick-cooking wheat noodles work as well.
- Vegetables - This recipe uses carrots, bell pepper, red onion, and scallions. You can swap in cabbage, bean sprouts, or mushrooms.
- Spring Roll Wrappers - These are the thin, wheat-based wrappers (also called spring roll sheets or pastry). Find them in the freezer section of Asian markets. Thaw completely before using. Not the same as rice paper wrappers used for fresh summer rolls.
Step By Step With Photos
Here's how to make this Chicken Noodle Spring Roll recipe with a simple visual guide.
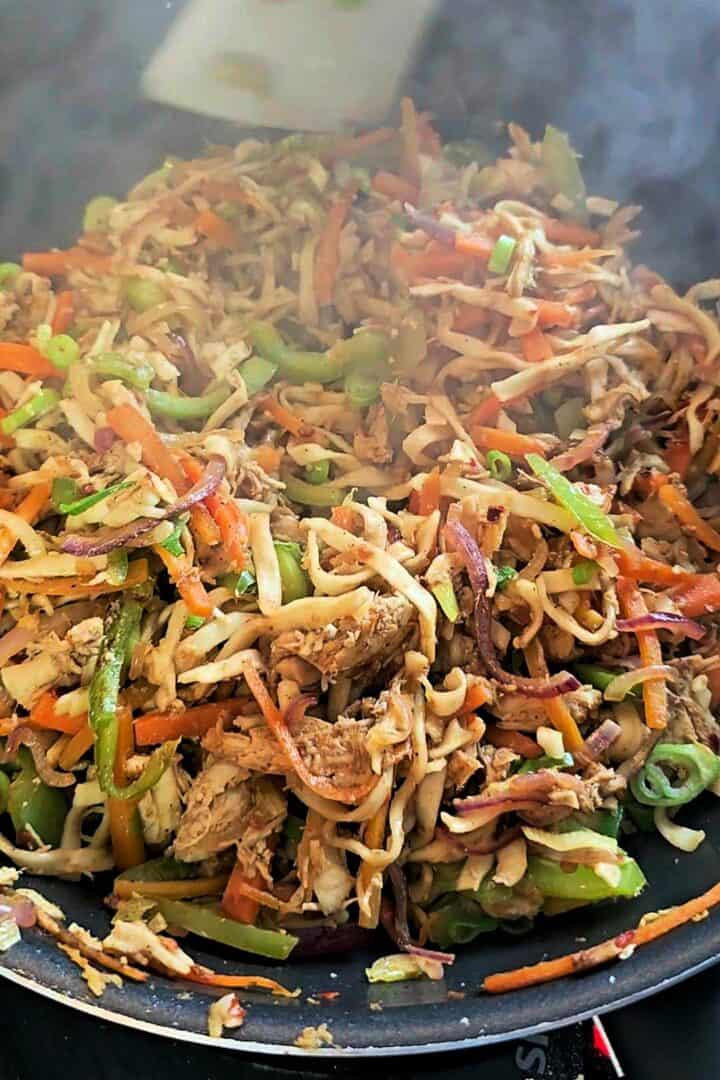

- Make the filling. Cook the filling as instructed, then transfer it to a plate and let it cool completely before rolling.
- Fill and roll. Place a spring roll wrapper in a diamond shape, add the filling near the bottom corner, fold, roll tightly, and seal the edges with slurry.
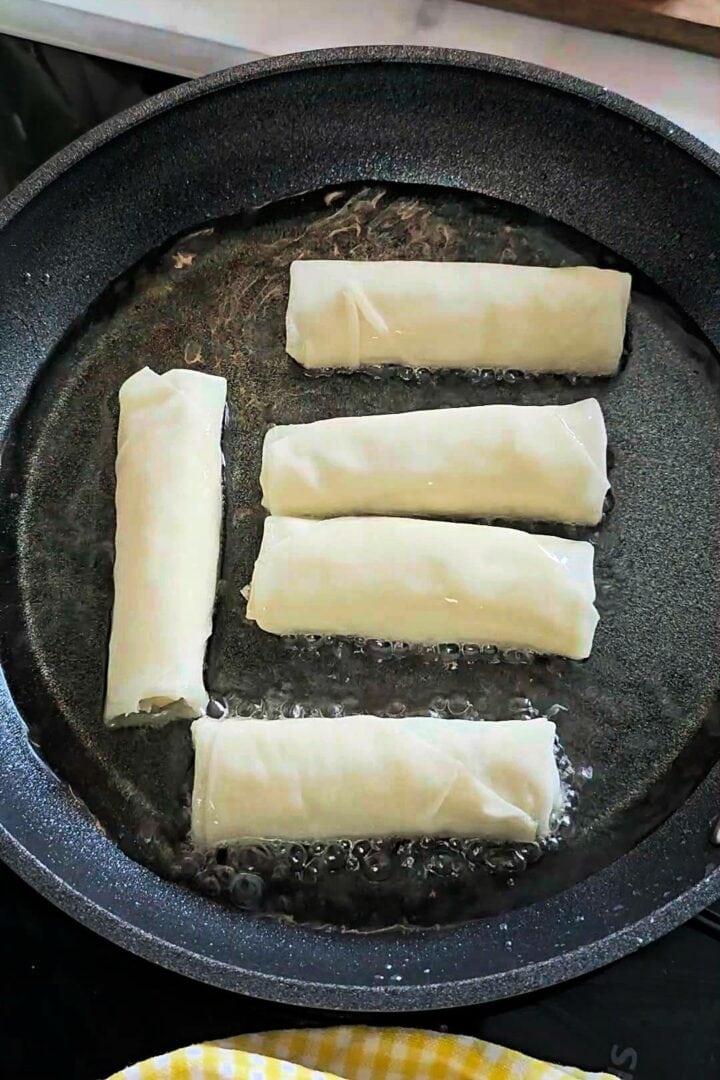
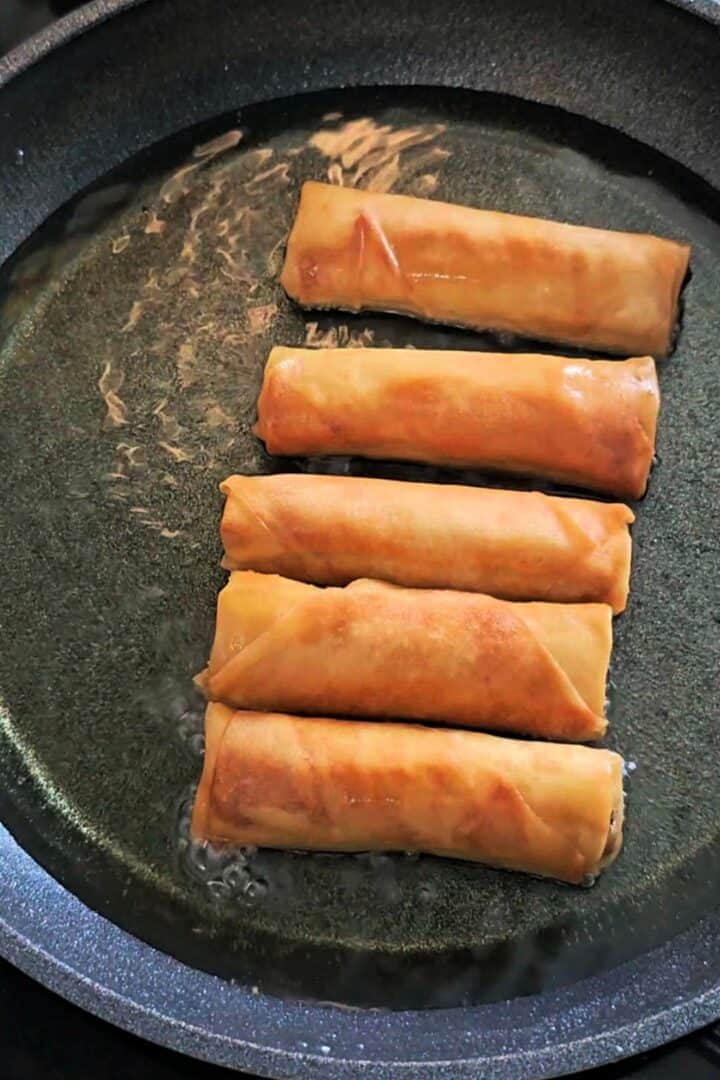
- Heat oil and fry. Heat oil in a pan over medium heat for shallow frying. Add the spring rolls in a single layer.
- Fry until golden. Cook, turning occasionally, until golden and crisp on both sides. Remove and drain on paper towels before serving.
How To Fold Spring Rolls
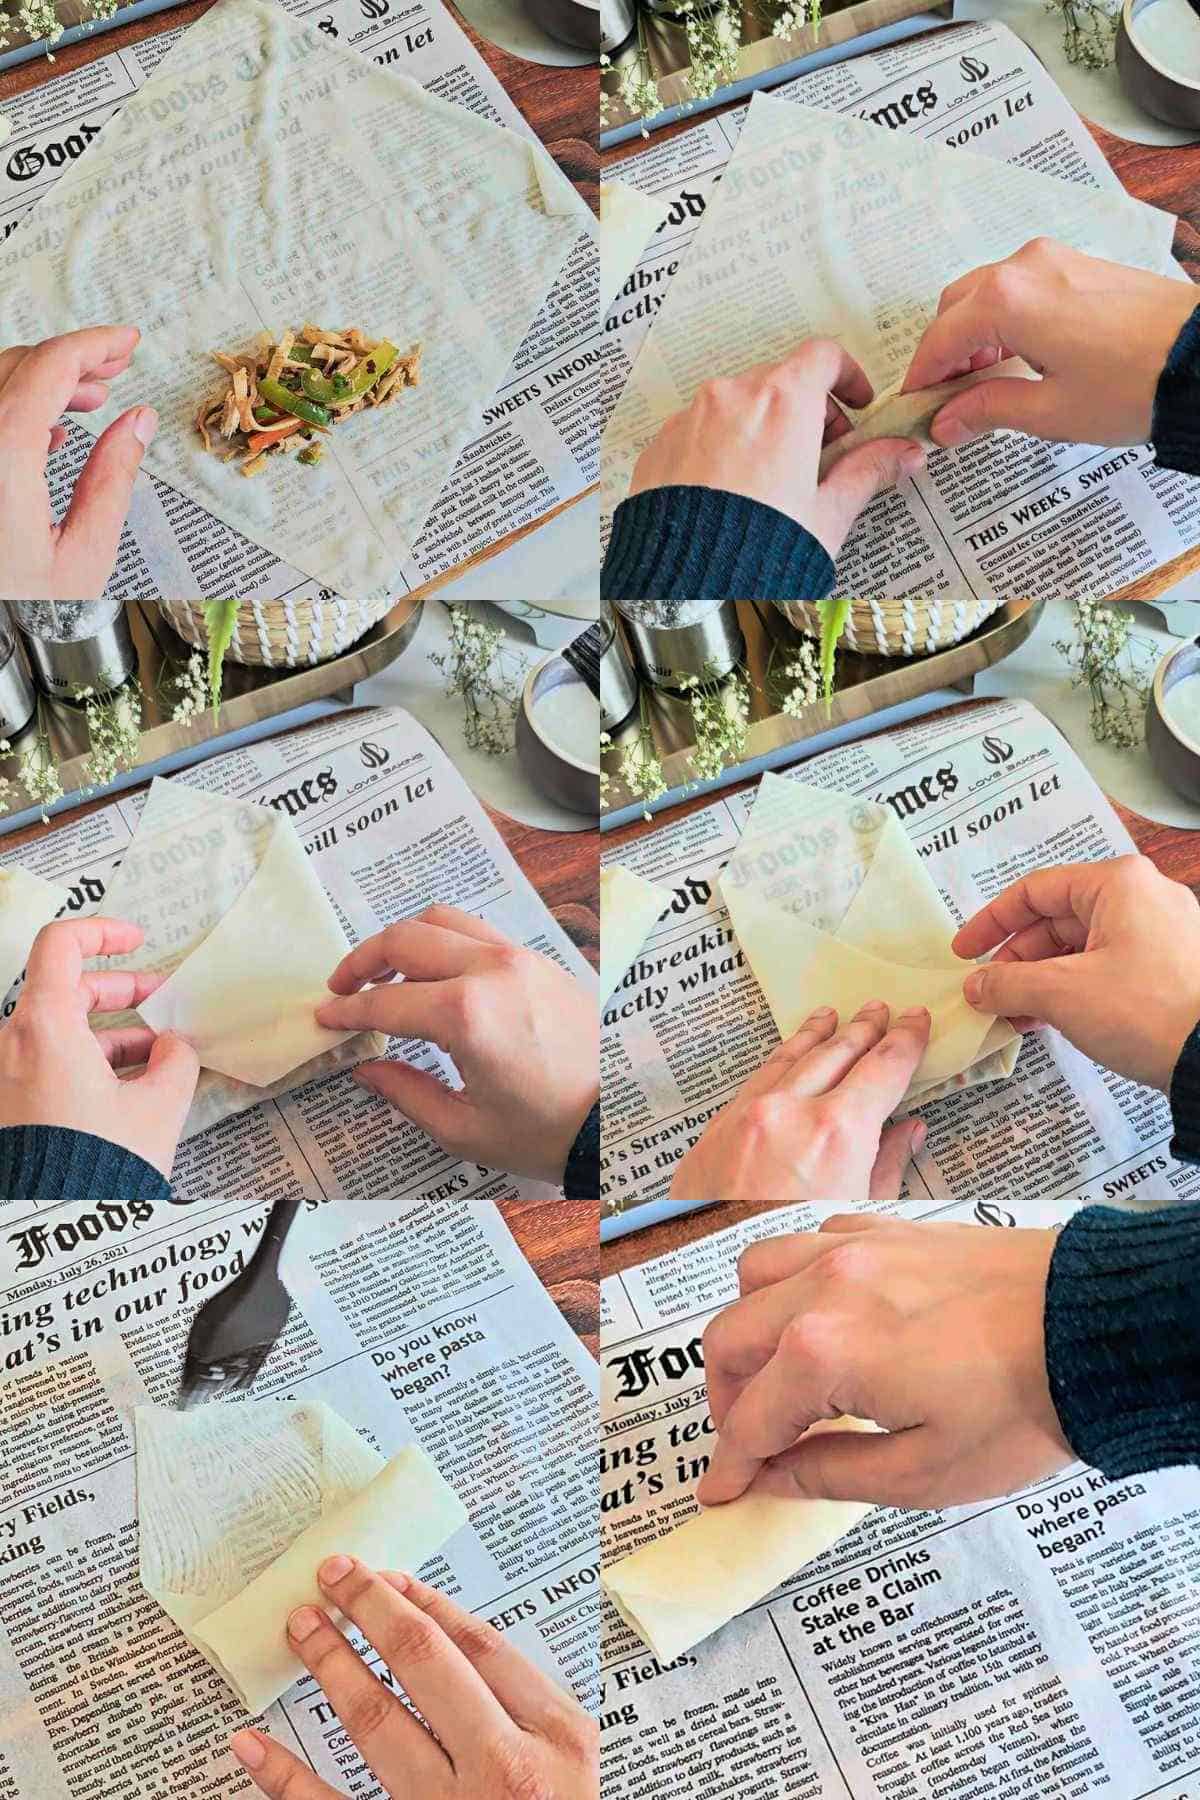
- Place a spring roll wrapper on a flat surface in a diamond shape (one corner pointing toward you).
- Add about 1½ tablespoons of filling near the bottom corner, leaving about 2 inches of space from the edge.
- Fold the bottom corner up and over the filling, tucking it in snugly to form a tight cylinder.
- Fold the left and right corners inward toward the center, overlapping slightly to enclose the filling on both sides.
- Continue rolling upward tightly, keeping the sides tucked in as you go, until you're about ¾ of the way up the wrapper.
- Brush the top corner and edges with the flour-water slurry, then finish rolling to seal completely. Press gently to secure.
Tips for Extra Crispy Spring Rolls
- Keep the filling dry - No excess moisture. After cooking, spread the filling in a wide pan to cool. This lets steam escape so the filling stays dry instead of making the wrappers soggy.
- Use bigger wrappers or double up - Either use a large wrapper (8.5 inch) with less filling so it overlaps multiple times and forms a thick, crispy coating, or use two smaller wrappers layered together for extra crunch.
- Control the heat - Start at medium heat so the rolls have time to cook through without burning. In the last 2 minutes, turn the heat to medium-high to get a deep golden color.
- Fry in a single layer - Do not overcrowd the pan. Leave space between each roll so they cook evenly and crisp properly.
- Drain on a wire rack - Transfer the fried spring rolls to a wire rack instead of paper towels. This prevents moisture from trapping underneath and keeps the bottoms crisp.
Make Ahead & Freeze
These chicken spring rolls are a perfect make ahead snack.
- After rolling, arrange them in a single layer on a tray lined with parchment paper. Make sure they are not touching each other. Freeze until firm, about 2-3 hours.
- Once fully frozen, transfer them to a zip-top bag or airtight container and store for up to 3 months.
- When ready to cook, fry straight from frozen. Do not thaw. Fry on medium heat until cooked through and golden, adding a few extra minutes to the cooking time.
FAQs
Yes, they won't be quite as crispy as fried, but still delicious. For baking, brush with oil and bake at 200°C/400°F for 20-25 minutes, flipping halfway. To air fry, spray with oil and air fry at 180°C/350°F for 12-15 minutes, flipping halfway through.
Spring rolls use thin, wheat-based wrappers and fry up lighter and crispier. Egg rolls typically have thicker, bubblier wrappers and a denser texture.
Yes, swap the chicken for extra vegetables, tofu, or paneer. Skip the chicken powder or use vegetable bouillon instead.
More Freezer-Friendly Appetizers
Let's Stay Connected! Follow me on Instagram, Facebook and Pinterest for the latest updates. And subscribe to my YouTube channel for video recipes.
📖 Recipe
Chicken Noodle Spring Rolls
Ingredients
For the Filling
- 14 oz (400 g) boneless chicken breast boiled and shredded
- 4 oz (100 g) noodles cooked al dente
- 2 tablespoon oil
- 1 teaspoon garlic finely minced
- 1 teaspoon ginger finely minced
- 3-4 green onions whites and greens separated
- 2 medium (150 g) carrots cut into thin matchsticks
- 1 medium (150 g) bell pepper thinly sliced
- 2 small (100 g) red onions thinly sliced
Seasoning
- 2 tablespoon chili garlic sauce
- 1½ tablespoon all-purpose soy sauce
- 1 teaspoon oyster sauce
- 1 tablespoon white vinegar
- ½ teaspoon salt
- ½ teaspoon black pepper
- 1 teaspoon white pepper
- 1 teaspoon chili flakes
- ¾ teaspoon chicken stock powder or crushed stock cube
For Rolling
- 30 square spring roll wrappers 8.5 inch / 21.5 cm
- 2 tablespoon all-purpose flour
- ¼ cup water
For Frying
- Oil for shallow frying
Instructions
Make the Filling
- Cook the noodles according to package instructions until just al dente. Drain well. Add a tablespoon of oil, toss and set aside.
- Heat 2 tablespoon oil in a large pan or wok over medium heat.
- Add the minced garlic and ginger. Sauté for about 30 seconds until fragrant.
- Add the spring onion whites and sauté for another 30 seconds.
- Add the carrots and bell pepper. Stir-fry on medium-high heat for 3-4 minutes until slightly softened but still crisp.
- Add the sliced red onion and toss for 1 minute.
- Add the shredded chicken and mix well.
- Add chili garlic sauce, soy sauce, oyster sauce, vinegar, salt, black pepper, white pepper, chili flakes, and chicken powder. Stir well so everything is evenly coated.
- Add the cooked noodles and gently toss to combine. If the noodles are too long, break a few strands with a spoon while mixing.
- Turn off the heat and mix in the spring onion greens.
- Transfer the filling to a wide plate and let it cool completely before rolling.
Assemble the Spring Rolls
- Make a sealing slurry. In a small bowl, mix the flour and water until smooth and lump-free. Set aside.
- Place a spring roll sheet on a clean surface in a diamond shape.
- Add about 1½ tablespoon (~22g) filling near the bottom corner.
- Fold the bottom corner over the filling, then fold in both side corners.
- Roll tightly until about ¾ of the way up. Brush the edges lightly with the prepared slurry and seal firmly.
- Repeat with remaining sheets. Each roll should be about 9 cm long.
Frying
- Heat oil in a pan for shallow frying over medium heat.
- Fry the spring rolls in batches, turning occasionally, until golden and crisp on all sides. Increase the heat slightly in the last minute for deeper color.
- Remove and drain on wire rack.
- Serve hot with your favorite dipping sauce.
Video
Notes
- How To Freeze: Arrange the rolls in a single layer on a plate or tray and freeze until solid. Transfer to a zip-lock bag and freeze for up to 3 months.
- Extra Crispy Tip: If using large spring roll sheets, keep the filling modest so the wrapper overlaps multiple times for a thicker, crisp outer layer. If using smaller sheets, use two wrappers to help the rolls stay sealed and extra crispy.
Nutrition
PIN IT FOR LATER

Leave a Review